

How To Create Site To Site Vpn
This Product is End-of-Life and End-Of-Support
End-Of-Life and End-Of-Support on December 1st, 2020: All Barracuda Firewall X-Series sales will cease; neither new sales nor any renewals will be available. If you currently hold a maintenance and support contract, you will continue to receive our award-winning support and services until your contract expires. Please see the End-Of-Life definition as described in the End of Support and End of Life Information.
Example - Configuring a Site-to-Site IPsec VPN Tunnel
To configure a Site-to-Site VPN connection between two Barracuda NextGen X-Series Firewalls, in which one unit (Location 1) has a dynamic Internet connection and the peer unit (Location 2) has a static public IP address, create an IPsec tunnel on both units. In this setup, Location 1 acts as the active peer. You will need to add an access rule to allow VPN traffic. Because t he WAN IP address of Location 1 is chosen dynamically via DHCP , t he remote gateway on Location 2 must use 0.0.0.0/0 so that any incoming IP address is accepted. Using 0.0.0.0/0 as the remote gateway is supported only for site-to-site tunnels in Aggressive mode. T his setup does not require third-party DNS services such as DynDNS.
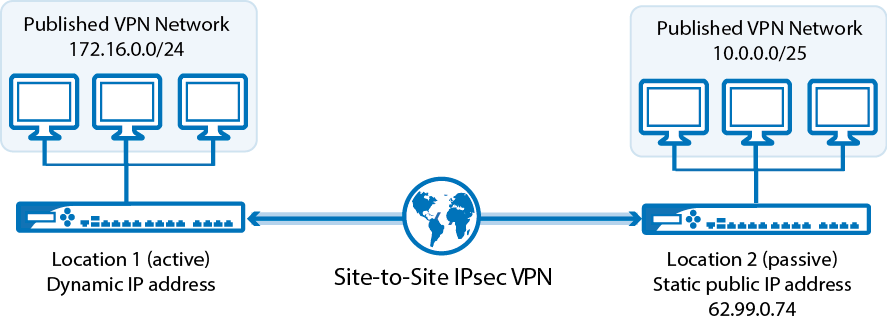
This example configuration uses the following settings:
| X-Series Firewall Location 1 | X-Series Firewall Location 2 | |
|---|---|---|
| Published VPN Network | 172.16.0.0/24 | 10.0.0.0/25 |
| Public IP Addresses | dynamic via DHCP | 62.99.0.74 |
Before you Begin
On the VPN > Settings page of both X-Series Firewalls, verify that you selected a valid VPN certificate. For more information, see Certificate Manager.
Step 1. Enable VPN Listener on the Dynamic IP Address of the Active Peer
On the X-Series Firewall at Location 1, enable Use Dynamic IPs in the GLOBAL SERVER SETTINGS of the VPN > Settings page for the VPN service to listen on all IP addresses.

Step 2. Create the IPsec Tunnel on Location 1
Configure the X-Series Firewall at Location 1 with the dynamic WAN IP as the active peer.
- Log into the X-Series Firewall at Location 1.
- Go to the VPN > Site-to-Site VPN page.
- In theSite-to-Site IPSec Tunnels section, click Add .
- Enter a Name for the VPN tunnel.
- Configure the settings for Phase 1 and Phase 2 .

- Specify the network settings:
- Local End – Select Active .
- Local Address – Select Dynamic .
- Local Networks – Enter
172.16.0.0/24(t he network address for the locally configured LAN), and click + . - Remote Gateway – Enter
62.99.0.74(t he WAN IP address of Location 2). - Remote Networks – Enter
10.0.0.0/25(t he remote LAN), a nd click + .
- Specify the authentication settings:
- Authentication – Select Shared Passphrase .
- Passphrase – Enter the shared secret.
- Enable Aggressive Mode.
- Define the Aggressive Mode ID.
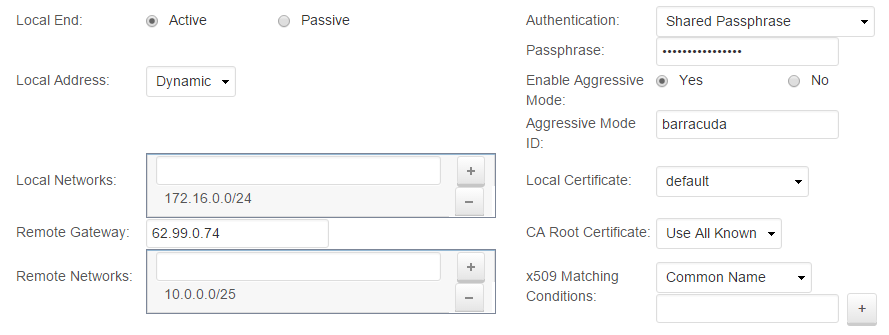
- Click Add .
Step 3. Create the IPsec Tunnel on Location 2
Configure the X-Series Firewall at Location 2, with the static WAN IP as the passive peer. Use 0.0.0.0/0 as the IP address for the remote gateway to allow the Location 1 unit to use dynamic WAN IP addresses.
- Log into the X-Series Firewall at Location 2.
- Go to the VPN > Site-to-Site VPN page.
- In theSite-to-Site IPSec Tunnels section, click Add .
- Enter a Name for the VPN tunnel.
- Configure the same settings for Phase 1 and Phase 2 as for Location 1.
- Specify the network settings:
- Local End – Select Passive.
- Local Address – Select
62.99.0.74(the WAN IP address of Location 2). - Local Networks – Enter
10.0.0.0/25(the network address for the locally configured LAN), and click +. - Remote Gateway – Enter
0.0.0.0/0because t he WAN IP address of location 1 is chosen dynamically via DHCP . - Remote Networks – Enter
172.16.0.0/24. (the remote LAN), and click +.
- Specify the authentication settings:
- Authentication – Select Shared Passphrase.
- Passphrase – Enter the shared secret.
-
Enable Aggressive Mode.
-
Define the Aggressive Mode ID.
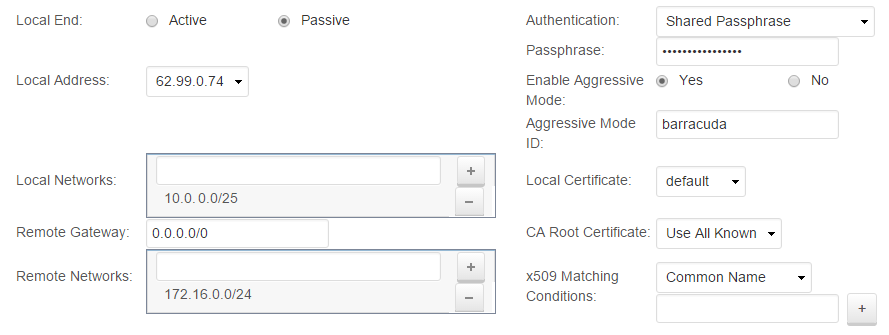
-
ClickAdd.
Step 4. Configure the Access Rule for VPN Traffic
Remote and local subnets are automatically added to the VPN-Local-Networks and VPN-Remote-Networks network objects when saving the Site-to-Site VPN configuration. If not present, go to FIREWALL > Network Objects and create these network objects. For more information, see Network Objects.

Create PASS access rules on both Location 1 and Location 2 X-Series Firewalls to allow traffic in and out of the VPN tunnel.
- Log into the X-Series Firewall.
- Go toFIREWALL > Firewall Rules page.
- Add an access rule with the following settings:
- Action – Allow
- Connection – Select No SNAT
- Bi-directional – Select the Bi–directional checkbox.
- Service – Select Any. All types of network traffic are allowed between the remote and local network.
- Source – Select the VPN-Local-Networks network object.
- Destination – Select t he VPN-Remote-Networks network object.
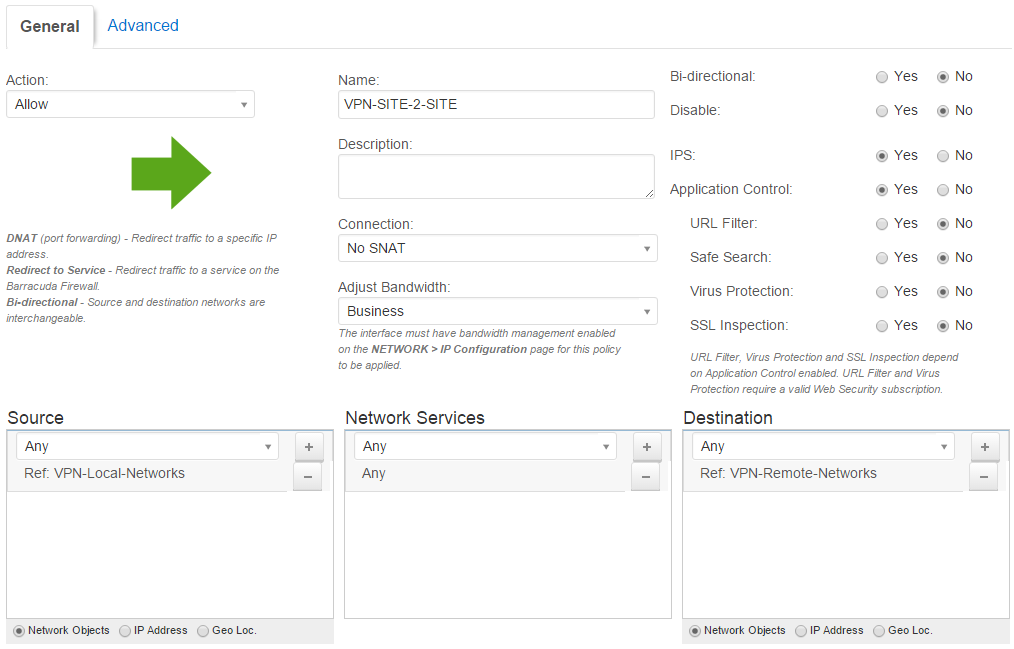
- At the top of the Add Access Rule window, click Add.
- Use drag and drop to place the access rule above any other access rule matching this traffic.
- Click Save.
Step 5. Verify Successful VPN Tunnel Initiation and Traffic Flow
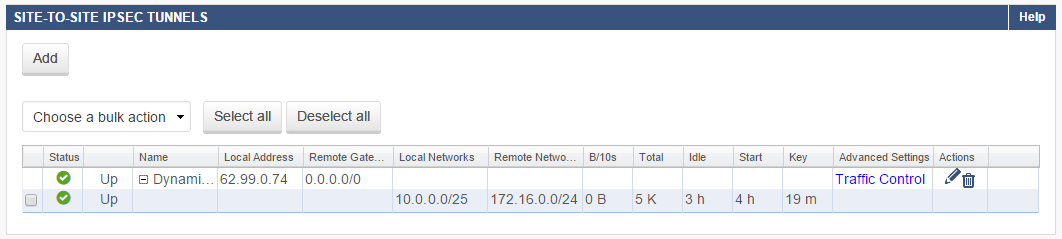
To verify that the VPN tunnel was initiated successfully and traffic is flowing, go to the VPN>Site-to-Site VPN page. Verify that green check marks are displayed in theStatus column of the VPN tunnel.
Use ping to verify that network traffic is passing the VPN tunnel. Open the console of your operating system and ping a host within the remote network. If no host is available, you can ping the management IP address of the remote X-Series Firewall. Go to the NETWORK > IP Configuration page and ensure that Services to Allow: Ping is enabled for the management IP address of the remote firewall.
If network traffic is not passing the VPN tunnel, go to the BASIC > Recent Connections page and ensure that network traffic is not blocked by any other access rule.
Last updated on
How To Create Site To Site Vpn
Source: https://campus.barracuda.com/product/nextgenfirewallx/doc/14320455/example-configuring-a-site-to-site-ipsec-vpn-tunnel/
Posted by: bockmartyart49.blogspot.com
0 Response to "How To Create Site To Site Vpn"
Post a Comment